
Sunday, February 28, 2010
Saturday, February 27, 2010
FT-817 To Be Sent Back Again For Repair
Well the Vertex-Standard guys did not really fix everything. They replaced the EMI filter but did not fully check out the radio. The radio will not charge the internal NiMH batteries nor will the radio power up from internal batteries. The Yaesu folks told me to send it back yet another time. Please guys (at Yaesu-Vertex) - would you do a comprehensive check before sending back the radio? This is getting old.
Thursday, February 25, 2010
FT-817 Back On-Line
Received the FT817 yesterday evening from the repair folks at Vertex-Standard and everything tested OK on send and receive.
Dialed into the BRARS 2m net last night and listened in on the swapnet.
Dialed into the BRARS 2m net last night and listened in on the swapnet.
Tuesday, February 23, 2010
Dummy Load Construction
The resistor kit for my Cantenna type dummy load described in k4eaa's site has arrived. The only missing components are a couple of brass or copper plates which I need to get from a hardware store.
Resistor Kit with Diode - K4EAA
Paint Can 1 qt - Ace hardware
Binding Posts (Radio Shack)
Brass plates - 2
Resistor Kit with Diode - K4EAA
Paint Can 1 qt - Ace hardware
Binding Posts (Radio Shack)
Brass plates - 2
Saturday, February 20, 2010
Latest Update
The MFJ1778 G5RV arrived along with 75 ft of coax. Part of the day was devoted to getting the shack electrical and RF ground buried. Just need an 1 5/8 hole saw for the right size hole through the siding that can be caulked tight. Ordered dacron rope from DX Engineering. Looks like a few days more before things get buttoned down.
Friday, February 19, 2010
FT817 Repair
Yaesu (Vertex-Standard) called me yesterday and indicated that the repaired FT817 will likely ship out next Monday
Tuesday, February 16, 2010
Incoming Hardware
Acquired an old TS830 from another ham - sitting proudly on my desk and waiting for an Astatic D104 microphone coming in from Colorado.
A 35W linear power supply - Astron RS-35M with meters on voltage and current is coming in from Indiana from N5RP.
A G5RV antenna was just ordered from HRO along with 75 feet of RG8X terminated with PL259s.
Just got a slingshot to help hang antennas. All I need now is some rope and pulleys and I should be all set.
Friday, February 12, 2010
Inverted V Dipole Performance
This site makes available a program you can download to calculate antenna efficiency based on parameters you input:
http://www.smeter.net/antennas/inverted-v.php
Run this Program from the Web or Download and Run it from Your Computer
This program is self-contained and ready to use. It does not require installation. Click this link Inv_Vee then click Open to run from the web or Save to save the program to your hard drive. If you save it to your hard drive, double-click the file name from Windows Explorer (Right-click Start then left-click Explore to start Windows Explorer) and it will run.
Inverted-V antennas are popular because, relative to horizontal dipoles, erection costs are lower, and/or because the size of the site is smaller than the overall length of the full size horizontal dipoles they substitute. Efficiency is less than a horizontal dipole of similar height, but the radiation pattern is more omni-directional which may be considered to be an advantage.
The inverted-V is defined by overall antenna length, straight-line distance between wire ends and height of wire ends above ground. Dimensions calculated by the program are the height above ground of the triangle's apex and the angle it subtends. When the distance between wire ends is set equal to overall wire length a low, but adjustable, horizontal 1/2-wave dipole results.
The resonant frequency of the antenna is continuously re-calculated from its dimensions. All computed data applies at the current resonant frequency. A within-amateur-band change in transmit frequency will not result in a significant change in performance provided the tuner is readjusted to maintain the correct load on the transmitter. Tuner L and C settings are not included in this program. To do so would overcomplicate and reduce its usefulness.
Miscellaneous One-Line Notes
- When the apex angle is 180 degrees the antenna reduces to a simple low dipole.
- To obtain 180 degrees set distance between wire-ends equal to dipole length.
- For small apex angles, bring the ends of the antenna nearer together.
- Radiation resistance and efficiency fall rapidly at small apex angles.
- Radiation resistance and efficiency fall as ends of antenna near the ground.
- Highest efficiency occurs at heights above ground greater than 1/4 wavelength.
- For small transmitting sites suitable apex angles are from 60 to 120 degrees.
- Height of the whole triangular model is set by varying height of the wire ends.
- At low apex height radiating efficiency is poor due to ground induced loss.
- NVIS propagation may be possible at HF even at very low average dipole heights.
- At extremely low heights resonant frequency may fall to crudely half normal value.
- To maximize efficiency raise wire ends as high as possible above ground level.
- Antenna resonant frequency is defined by feedpoint reactance = zero ohms.
- Resonant frequency falls fast at low heights due to capacitance of ends to ground.
- Soil resistivity is in units of ohm-metres = 1/(Soil conductivity).
- Soil resistivity is seldom accurately known. A guess within +/-50% is okay.
- Greater than normal uncertainty in estimating performance is unavoidable.
- A 100 watt tuner will not normally increase overall loss by more than 0.25 dB.
- The program needs feedline wire gauge to compute line loss and input impedance.
- Type of line is auto-selected: If Zo is less than 100 then greater than 100 then balanced.
- Line attenuation per 30 metres is same as dB per 100 feet at same frequency.
http://www.smeter.net/antennas/inverted-v.php
Run this Program from the Web or Download and Run it from Your Computer
This program is self-contained and ready to use. It does not require installation. Click this link Inv_Vee then click Open to run from the web or Save to save the program to your hard drive. If you save it to your hard drive, double-click the file name from Windows Explorer (Right-click Start then left-click Explore to start Windows Explorer) and it will run.
How High A Dipole
A great write-up for those interested in dipole performance and this write-up equally applies to G5RV All-Band Dipoles As Well. Note that this is for a normal dipole where the ends are as high as the feedpoint. For those interested in Inverted V configuration I have a follow-up post but in general the efficiency is less and the radiation pattern more omnidirectional.
Dipole Antennas - the Effect of Height Above Ground
I frequently hear the question: how high should my dipole be? Or alternatively, will my dipole work well at this or that height? Unfortunately, these questions can not be answered without first stating what you want the dipole to actually DO, i.e. how you plan to operate with it. Some possible goals for a dipole might be:
1. DX work.
2. Local work: nets and rag chewing.
3. Directionality: gain in one direction, or nulls in some other direction
4. Omni-directionality.
5. Feed point impedance of 50 ohms.
As you may surmise, many of these potential goals are mutually exclusive, or at least tradeoffs.
However, once you define what you want to do with your dipole, then you can look at the radiation patterns to see if it will accomplish those goals.
I make the assumption that anyone reading this understands that DX work requires a low angle of radiation, with gain in the favored direction being desirable. Nets and rag chewing require a much higher angle of radiation and an omni-directional pattern. A null aimed in some direction may be desirable in various situations. Something close to 50 ohms impedance will aide matching and power transfer to/from coax cable.
There are many other potential goals for a dipole, but the ones I have listed are those that are most dependent on it's height above ground. Thus this discussion will not touch upon the issues of multi - banded operation, tuned open wire feeders, and the like. So, lets limit the issue at hand to: how the character of a dipole varies with its height above ground.
To investigate this problem, I have modeled a hypothetical wire dipole using the EZNEC program (from W7EL). This model is well within the verified capability of EZNEC.
For those interested in the modeling details, this dipole, named D40M, has the following specifications:
Material: #12 copper wire.
Length: 69.057 feet.
Ground Type: good (.005,13) NEC Sommerfield.
Frequency: 7.00 MHz nominal, but the comparative patterns were computed by adjusting the frequency slightly for resonance at each height.
The dipole was modeled at various heights from .05 wavelengths (7 feet) to 4 wavelengths (560 feet) above good ground. One may argue that 560 feet is ridiculous for a 40 meter dipole, but keep in mind that the data can be scaled down to a 10 meter dipole with similar results.
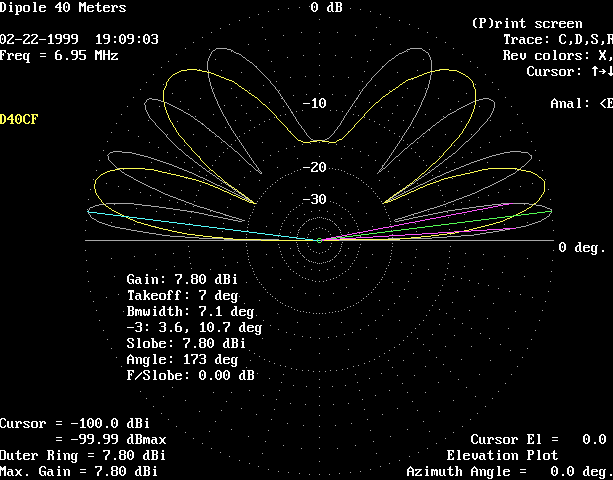
The table below tabulates the results. In the first two columns, the antenna's height above ground is given in wavelengths and in feet. The next two columns show the maximum gain in the favored direction (i.e. broadside to the wire), followed by the launch angle and the -3 dB vertical beam width. The next two columns once again present the gain and launch angle / beam width, but for the axial direction (off the ends of the wire). Finally, the last 2 columns list the complex impedance at the feed point, and the actual resonance frequency at that specific height.
| Height | Height | Fav Dir | Fav Dir | End Dir | End Dir | |||||
| Launch | Launch | |||||||||
| Wave | Gain | Angle/ | Gain | Angle/ | Feedpt | Res. | ||||
| Lengths | Feet | (dbi) | Bmwidth | (dbi) | Bmwidth | Z | Freq | |||
| 4.0* | 560 | 7.75 | 4 / 4 | 5.57 | 72 / 13 | 6.93 | ||||
| 3.0 | 420 | 7.83 | 5 / 5 | 5.25 | 68 / 14 | 77+ j11 | 6.94 | |||
| 2.0* | 280 | 7.80 | 7 / 7 | 0 | 39 / | 75 + j12 | 6.95 | |||
| 1.5 | 210 | 7.72 | 9 / 10 | -2.50 | 33 / | 75 + j11 | 6.96 | |||
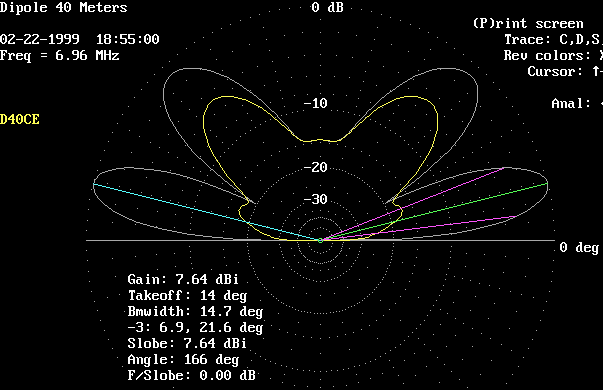
| 1.0* | 140 | 7.64 | 14 / 15 | -11.00 | 20 / | 74 + j08 | 6.96 | |||
| .9 | 126 | 7.03 | 16 / 17 | -8.30 | 22 / | 85 + j13 | 6.94 | |||
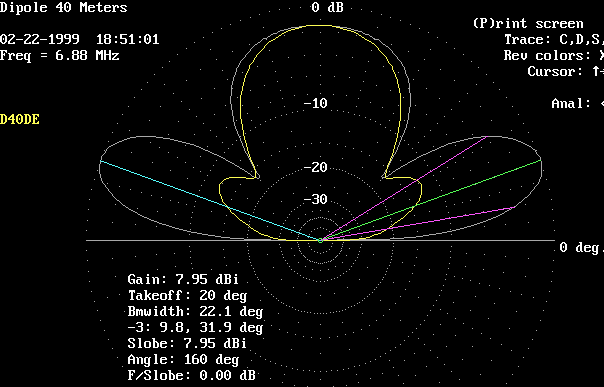
| .8 | 112 | 7.16 | 18 / 19 | -6.40 | 25 / | 84 + j26 | 6.88 | |||
| .7* | 98 | 7.95 | 20 / 22 | -4.50 | 30 / | 70 + j30 | 6.88 | |||
| .6 | 84 | 8.35 | 23 / 26 | -1.95 | 40 / | 60 + j16 | 6.94 | |||
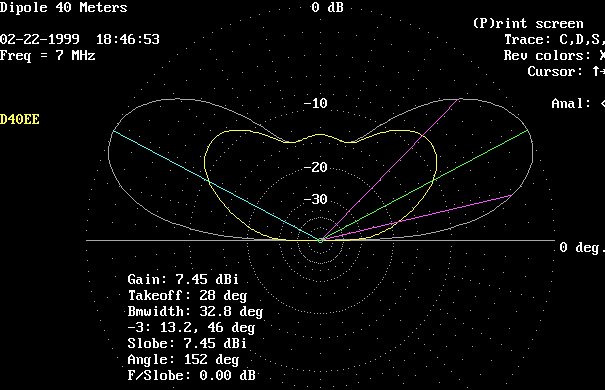
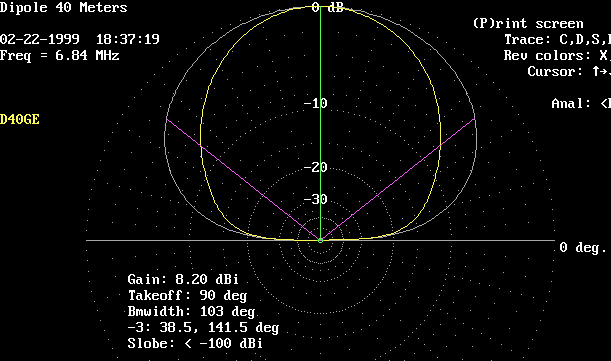
| .5* | 70 | 7.45 | 28 / 33 | -0.51 | 43 / 33 | 71 - j00 | 7.00 | |||
| .4 | 56 | 6.06 | 35 / 47 | 1.30 | 59 / 102 | 93 + j04 | 6.98 | |||
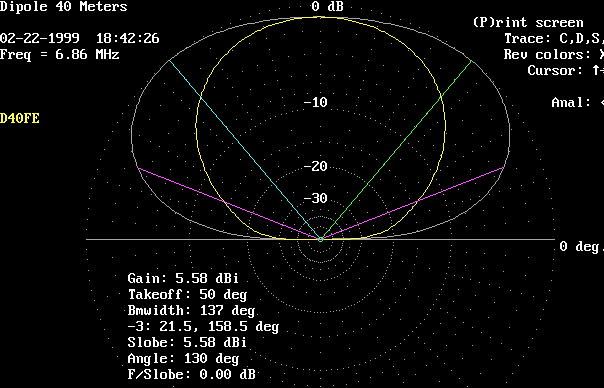
| .3* | 42 | 5.59 | 50 / 137 | 4.71 | 90 / 80 | 100 + j32 | 6.86 | |||
| .2 | 28 | 6.70 | 90 / 118 | 6.70 | 90 / 67 | 71 + j56 | 6.77 | |||
| .1* | 14 | 8.21 | 90 / 103 | 8.21 | 90 / 66 | 23 + j39 | 6.84 | |||
| .05 | 7 | 9.61 | 90 / 99 | 9.60 | 90 / 72 | 7 + j12 | 6.95 |
* Elevation plots shown below
The first thing to notice is that the gain in the favored (broadside) direction varies very little with height. The important change in the broadside pattern occurs in the launch angle of the primary lobe. As the antenna moves closer to the ground, the launch angle of radiation gets higher and the -3 dB vertical beam width becomes broader. Note that below the benchmark height of ½ wavelength, the launch angle increases rapidly. Once the dipole is lowered to 0.3 wavelengths, most of the radiation goes in a vertical direction. This explains the frequently heard "rule" that a dipole must be at least ½ wavelength high to work. The seeming anomaly with the beam width below 0.4 wavelengths is easier to understand by viewing the plots shown below.
One frequently sees a dipole azimuth pattern depicting a very sharp null off of the ends of a dipole. While technically accurate, this can be very misleading as the table above shows, and is a result of trying to depict a 3 dimensional pattern in 2 dimensions. This often seen null is only evident at the same launch angle as the maximum broadside gain. Of major significance is the large amount of gain off the ends at higher launch angles. Due to multiple lobes forming above ½ wavelength, this is not easily shown in tabular form. I have arbitrarily chosen to list gain and launch angle for the secondary lobe with the lowest launch angle, but recognize that there is frequently a stronger primary lobe at higher angles. Consult the plots below for a better visualization.
The reference antenna length was chosen to resonate at the ½ wavelength height. As expected, the feed point impedance oscillates significantly as the height changes from our reference point. Thus we verify the old adage that you must trim the dipole to fit your particular QTH (height being very important). The corresponding resonant frequency for each height is shown in the last column for reference, since complex impedance's may be of less practical importance to some.
Now we are back to looking at what we want the dipole to achieve.
For DX work, higher placement is warranted, since more power concentrated between 5 and 15 degrees is reported to be of major benefit. Heights around one wavelength are necessary to get the broadside lobe to launch in this range. However, higher may not always be better. Pay careful attention to the magnitude of secondary lobes in the broadside direction, as well as high angle radiation off the ends. Some heights would appear better than others due to concerns with nulling out local QRM. A complete discussion of of this aspect is beyond the scope of this article, but may be investigated at a later date.
For local work, lower heights appear to be more beneficial. Note especially how omni-directional our dipole becomes at lower heights. Below 0.4 wavelengths, there is less than 1 dB of attenuation in the end fire direction, which suggests a height between 0.4 and 0.3 might be an ideal compromise for local nets and rag chewing.
Feed point impedance and matching does not seem to be of major concern except at very low heights. The effect of height on 2:1 SWR bandwidth was not investigated.
Our first plot shows the elevation pattern in both the broadside (white trace) and end fire (yellow trace) directions for a height of 4 wavelengths, or 560 feet. Note the substantial high angle radiation in all directions, in addition to the excellent low angle lobes.

This plot shows the elevation patterns at a height of 2 wavelengths, or 280 feet.
White trace is broadside. Yellow trace is axial (off the ends).
Still Lots of high angle radiation.
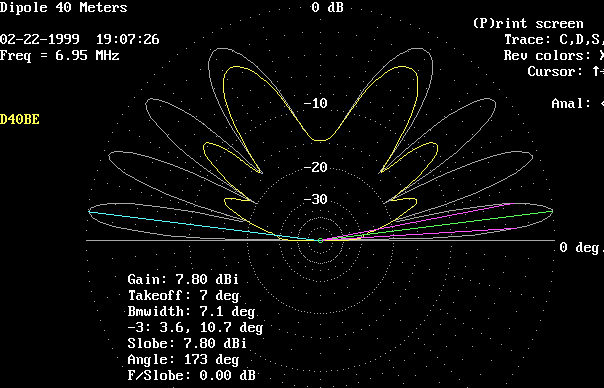
This plot shows the elevation patterns at a height of 1 wavelength, or 140 feet.
White trace is broadside. Yellow trace is axial (off the ends).
The secondary lobe is down to 47 degrees, but the primary lobe is up to 14 degrees.
This plot shows the elevation patterns at a height of 0.7 wavelength, or 98 feet.
White trace is broadside. Yellow trace is axial (off the ends).
The primary lobe is up to 20 degrees.
Note the large vertical lobe which has appeared!
This plot shows the elevation patterns at a height of 1/2 wavelength, or 70 feet.
White trace is broadside. Yellow trace is axial (off the ends).
Now that's a classical dipole pattern!
This plot shows the elevation patterns at a height of 0.3 wavelength, or 42 feet.
White trace is broadside. Yellow trace is axial (off the ends).
We are entering the "skywarmer" mode here.
This plot shows the elevation patterns at a height of 0.1 wavelength, or 14 feet.
White trace is broadside. Yellow trace is axial (off the ends).
This plot shows comparative elevation patterns, in the broadside direction only,
White trace is for 2 wavelengths, 280 feet.
Yellow trace is for 1 wavelengths, 140 feet.
This plot shows comparative elevation patterns, in the broadside direction only.
White trace is for 0.7 wavelengths, 98 feet.
Yellow trace is for 0.5 wavelengths, 70 feet.

This plot shows comparative elevation patterns, in the broadside direction only.
White trace is for 0.5 wavelengths, 70 feet.
Yellow trace is for 0.3 wavelengths, 42 feet.
Pink trace is for 0.1 wavelengths, 14 feet.

Thursday, February 11, 2010
My FT817 Out For Repair
The old standby QRP radio has been sent to vertex Standard in Cypress CA for repair. I hope to get it back soon to get back on the air again.
Monday, February 8, 2010
Dedicated Shack
Well here I am trying to establish a dedicated shack in a spare room in the basement. I moved an old computer desk I made a long time ago from the loft. I also brought down my oak desk chair. I am resurrecting an old desktop computer running Windows XP . I will take pictures once things are in order.
My FT817 Died
This is really very strange how this happened. KQ4VY was helping me set up HRD and DM780 on my FT817. My battery was running low and it was hard to read the display with battery power so decided to listen to the waterfall on PSK31 and tried to connect to external power. The FT817 won't power up - dead as a doornail. Then we tried to power up his FT817 with the same power supply and that was dead a s door nail. We searched for another reliable power source for the rig and tried to use the E-DC-6 12 volt charger and no luck. In fact, it blew the fuse in the E-DC-6 charger. The following is the letter I wrote to Yaesu:
From: Ariel Jacala (kj4rel@gmail.com)
Type: Tech Support
I am writing concerning with what I believe to be a glaring weakness in the
FT817 circuitry. Two days ago, while trying to operate on PSK31 with 2.5
Watts, I tried to supply external power using an Alinco metered switching
power supply DM-330MV. The power supply was reading a nominal and stable
voltage of 13.8V
On page 2 of the FT817 manual it indicates that this radio should be able to
function at this voltage:
Supply Voltage: Normal: 13.8 VDC ± 15 %, Negative Ground
Operating: 8.0-16.0 V, Negative Ground
FBA-28 (w/8 “AA” Alkaline Cells): 12.0 V
FNB-85 (Ni-MH Battery Pack): 9.6 V
We turned off the radio first before hooking up the lead from the power
supply. We found that the radio will not power up at all.
Is this a weakness in the FT817 circuit? One may be too quick to fault the
power supply. I don’t think I did anything which is not prudent amateur
radio practice (always operate at low power, stable voltage) and all we
tried to do in this instance is to power up the radio with the external
power supply connected. We were extremely careful that we had the right
polarity (page 9 on the manual). Furthermore, I was working under the
supervision of an experienced operator KQ4VY
We have scoured the internet forums QRZ, Yahoo FT817 Group, and Eham for
similar pattern and we ran into frequent occurrences of inability to power
up on FT817s for no apparent reason.
My fellow FT817 enthusiasts and I would appreciate it if you can rectify
this weakness in the FT817ND in the course of your repair. I had been
considering the purchase of an FT897D for higher power portable work and now
I have my doubts.
I am packing and sending my Yaesu FT817 tomorrow for shipment to the address
on your website.
Regards
Ariel Jacala KJ4REL
Thursday, February 4, 2010
How to Tune a Kenwood Hybrid from K4EAA
Here are some instructions for how to properly tune your Kenwood hybrid transmitter. It takes longer to describe than it does to actually tune the rig! When you have done it a few times, you can tune up in about 5 seconds total, faster than it took you to read this paragraph!
* Begin tuning with the Mode Switch in the Tune position. That reduces the screen voltage, and mis-tuning won't harm the rig. Start with a dummy load if possible.
* Set the Load Control to Minimum, and dial in the band (approximately) on the Plate control
* Set the Meter Switch to ALC
* Turn the CAR Control (carrier) up 1/2-3/4
* Place one hand on the Send switch and the other on the Drive control
* Flip the Send switch and peak the Drive control. If the meter pegs, turn down the CAR control and peak Drive again.
* Switch Meter to Ip (plate current)
* Flip Send switch and tune the Plate tuning to dip the Meter (minimum reading). This is usually the max power output point as well.
Now you're ready to go for some power! As you perform the steps below, don't leave the rig in Send more than 5 seconds at a time. Give it a rest now & again as you get familiar with this. Most of us can tune a rig in about 5 seconds total, you will too when you've done it a few times!
* Switch Mode to CW
* Flip the Send switch and re-dip the Meter with the Plate control
* Note the Meter reading - You are looking for about 225ma, depending on your power needs - About 1/3 to 1/2 less for PSK or RTTY
* It will probably be low. Turn up the Load control about 10 degrees, and re-dip the Plate control. Continue doing this until you get about 225ma of plate current when dipped. Remember not to leave the rig in Send too long while you're learning, give it a 5 second rest every 5 seconds.
You're almost finished! Transmitting at this point would be fine, but you may be able to tune for a bit more power. The next adjustments should be small adjustments, you are "fine tuning" things at this point.
* Switch your Meter to RF, or use an external power meter for reference.
* Tune the Plate control for maximum power output. You should see about 100W if you have a power meter.
* Try adjusting the Load up or down a bit, re-peaking with the Plate tuning after every adjustment.
* When you're satisfied with your tune-up, check Ip, the plate current, and make sure you're not too far from the 225ma target, and note the position of the controls to use this as a starting point whenever you return to this band.
* For CW, use the CAR control, and for SSB, use the MIC control to keep the ALC within the range shown on the Meter. This will insure maximum power output without excessive compression.
Things to Watch for While Tuning
Tune-up is a good time to check your rig for maintenance requirements. Your Kenwood hybrid is an excellent tube tester, better than commercially made ones, in fact. It exercises the tubes under actual working conditions, and meters the results for you to observe.
1. Notice how much drive is available. A fresh 12BY7A will provide more drive than necessary to swing the ALC Meter through its range, even on 10M. Low drive on any band shows that the driver tube is probably falling off in emission. It will continue to function for a while, but you might consider replacing it in the near future.
2. Watch for falling drive level as the rig is keyed for a few seconds. A 12BY7A near the end of its life will fall off in drive within a few seconds or so of key-down. If you see your drive fall as you are watching, that tube is positively ready for retirement.
3. Check the sharpness of the dip in CW Mode. A broad, shallow dip means the finals are nearing the end. You will notice reduced power output as well, most noticeable on the higher bands.
4. Check for falling plate current under key down conditions. Just like the driver tube, final tubes at the end of their useful life will jump to full Ip and then quickly start falling off. When you spot this, they are ready for recycling.
A Few Notes Related to Output Power
The difference between 50W and 100W is 3db. An S-unit is 6db. Consequently, the difference between a 50W rig and a 100W rig at the receiving end is about 1/2 S-unit. The difference between 90W and 100W rigs is not even discernable at the other end. Likewise between 100W and 110W. Resist the urge to load up your rig "To The Max," as all it does is shorten the life of most everything in the final section of your hybrid.
A reasonable increase in power, the first step really worth taking, is times ten. This holds for audio amps, HF amps, heck, for most all amps! The difference between 100W and 1,000W is 10db. That is about 1-1/2+ S-units at the receiving end, and is indeed noticeable. About the same as going from a poor antenna to a good antenna.
The HV position of the meter reads the plate voltage applied to the finals. The Kenwood hybrids utilize a voltage doubler circuit in the HV power supply, and aging High Voltage capacitors can result in low output. To check for this possibility, monitor the HV as you key the rig. It is normal to see perhaps 10% drop in HV when keyed. Anything much in excess of this might indicate failing capacitors.
Subscribe to:
Posts (Atom)